Tuesday, June 12, 2012

Teddy Bear Trail Mix Favor Station

Last summer, when my best friend was getting married, we went to several bridal shows.  One of the new...hip ways to do favors for showers or weddings was to create a candy or cookie bar.  Party-goers would receive a bag or carton to fill at the bar with whatever they wished...personalizing it for their own taste.  I used this at her bridal shower.

However, when it came time to do her baby shower, I wanted to do a similar type of favor.  PERSONALLY, I think this type of favor is much easier on the host.  I didn't have to fill little bags, or cut anything.

I wanted to create a bar, though, that went along with her shower theme.  Her sister and I decided a teddy bear shower would be neat and easy (as we both were big collectors of Boyd's bears and such).  Therefore, when I came across this pin...I liked it "bear"-y much! :)

The idea and instructions can be found at: http://www.christyrobbins.blogspot.com/2012/03/tea-party-teddy-bear-trail-mix-favor.html

At first, I was going to use another pin Idea I had seen at: http://pinterest.com/pin/186547609535333379/
And cut and sew out teddy bears with pockets at their head to be used and filled with.  However, I just couldn't find the time.  So, I ended up going to Walmart and purchasing some clear treat bags like the ones here: http://www.walmart.com/catalog/product.do?product_id=11061413&findingMethod=rr

I bought large shipping labels to make stickers for the favors.  Using MS Publisher and the Avery code on the label package, I designed some labels with a picture of a teddy bear and a cute poem regarding the baby.  I stuck those on the bag, placed the metal tie under one of the corners of the sticker for easy access for the guest.

My final trail mix bar looked like this:

As you can see, I had a few more treats then the other site.  Here was what I came up with:
Teddy Bear Trail Mix: Bear Poop=Raisinettes; Bear Stuffing=Popcorn; Bear Noses=Strawberry Whoppers; Bear Eyes=Whoppers; Bear Snacks=Gummy Bears; Bear Crackers=Teddy Grahams; Bear Body Parts=Twigs (pretzels), Berries (dried fruit), Peanuts; Bear Kisses=Hershey kisses


It was a huge hit!

Daddy Took Kit

As mentioned earlier, my BFF is expecting a baby boy this summer.  This will be the first child for her husband (she has 2 from a previous marriage).  His awe and wonderment to the whole experience has been entertaining...to say the least.  Therefore, I knew I wanted to do something for him at the shower.  I found this pin at first...to start the creativity juices flowing:
http://pinterest.com/pin/186547609534922342/
However, my BFF found a neat idea at:
http://todaysfabulousfinds.blogspot.com/2010/05/daddy-diaper-tool-belt.html

I liked this one because...if anything...he could at least use the tool belt. :)  My finished product looked like this:

I really liked the poems provided at the site.  I used it, too...however...

SUGGESTION: If money is an issue, there are some items listed in the materials needed that are NOT mentioned in the poem...therefore...you could do without them if needed.  I was able to get most at the dollar store.  I purchased the belt, though, at Walmart.  And I got the surgical cloves and mask from a relative that works at a medical facility.  :)

Diaper Baby

During the spring, my husband's cousin was having a baby shower for her first child, a little girl.  I wanted to make something special...as I would not be able to attend.

I came across this pin: http://pinterest.com/pin/186547609534794481/
However, when I clicked on the pin, it resulted in a website that sells them.  I, of course, felt.."Challenge Accepted" and began thinking about how to make one like it...but a girl one instead.

So, I made this little girl:
She is made an entire small bag of newborn diapers.  You begin with the head.  I started with the first diaper rolled up and then began wrapping the other diapers around it...kinda like you are making a diaper rose (if that makes sense).  The body I stuffed with the remainder of the diapers.  The arms are made from a flannel receiving blanket that is stuffed into the shirt and onesie like the arms.  Same for the legs.  

SUGGESTION: When you purchase the items for this baby, you may find it cheaper or find that it is only possible to purchase the items in packages of more then 1.  For instance, when I bought the baby cap, it came in a package of 3.  I used the other 2 caps to stuff into the mittens as hands or the socks as feet.

Total items in this baby: 1 pkg of newborn diapers, 1 long-sleeved onesie, 1 short-sleeved onesie, 1 pant, 1 pair of socks, 1 pair of mittens (the kind used for newborns to prevent them from scratching themselves), 1 binkie, 1 cap, 1 fleece receiving blanket, at least 2 flannel receiving blankets, and 1 scrapbook.  I used the fleece receiving blanket to cover the scrapbook to use as a base for the baby.

HOWEVER, although this was a huge hit at the shower, my OCD did NOT like the fact that this newborn baby looked to be about 6-9 months old once she was stuffed an made.  So when my BFF was having her baby shower, I made sure to try and do it better.  


This time I did the following:
1.  I only used about 6-10 diapers for the head.  I used 2 receiving blankets to make the arms and just put the mittens on the end to cover them up.  The body was made round with 2 other flannel receiving blankets stuffed with a few more diapers, the extra caps, and extra binkie.  The pants are stuffed with walmart bags (to make them flexible enough to tuck them under the baby).  And the feet...I used the packaged that came with the small socks.  They were purchased with small plastic like feet in them already...so I just kept that.  Because I used a scrapbook as a part of one of our activities at the shower, I just used some leftover foam board I had around the house to use as the base.  


Tank Top Season

First, I want to make it obvious that I do NOT believe I have arms that should be shown in tank tops.  My "second bye-bye" has grown by leaps and bounds as I've aged.  (Second Bye-Bye=the name for the flab on my upper arms.  Named thus because when I wave bye-bye with my hands, my "second bye-bye" waves bye bye towards the floor).  That being said, I also can't stand having a farmer's tan in the summer time.  So when I saw this pin, I felt inspired.

Pin: http://pinterest.com/pin/186547609534812495/

Finding an old T-shirt was NOT a problem.  My husband has oodles...and many he does NOT even wear.  But when I mentioned my desire to try out this pin...you would have thought each and every t-shirt was a long lost friend that I just could NOT butcher up or touch in any way.  

Unfortunately, while he was at work, I found a victim in the back of his closet.  

SUGGESTION:  In the instructions, it shows cutting 2 strips from the base of the original T-shirt.  Unfortunately, I did NOT read the instructions thoroughly enough!  And I thought, "Surely they don't want me to use the sewn hem from the original as a tie!  It won't match the other tie." So I cut a 3rd strip from the base of the original T-shirt.  You do NOT need to do this.  If you read the instructions it explains that you discard the original hem and use just the 1 strip you cut as the ties.  

Also, I sewed a new hem at the base of the shirt...just because I'm OCD like that. 

Here's my results:
I'm happy with it. :)  

Last suggestion:  I would wear a tank under these shirts as having to cut off the sleeves can result in large arms holes. 


Picture Hanger

With the purchase of our new home, I wanted to create a wall like in my old house with a collage/mosaic of framed photos of all 5 of our kids.  (Yes...together we have 5 kids...therefore cutting costs, budgeting, organization, and making the most of what we have...is one of the reasons why I'm so attracted to Pinterest).

After placing most of my frames up, I realized that one of my favorite frames had lost it's hanger in the back (maybe in the move).


I found the pin at:
http://pinterest.com/pin/32299322297662917/

With the instructions at: http://www.apartmenttherapy.com/tried-tested-hanging-art-with-142868

As I mentioned before, we try to cut back on our trash bags for the sanitation department by burning half of it.  But we, also, recycle all our pop cans.  Therefore, access to pop tabs was easy.  The only difference that I did was that I popped the tab off so that the tab stayed in whole...resulting in a perfect small loop/hole for the screw to go through.
WARNING:  Because the tab is made of aluminum...it is a soft metal.  When you go to put the screw through, be careful that there isn't too much tension on the tab itself as it will tear or break.

After the first attempt, I ended up with:

And it hung up like a charm. :)

Fire Starters

We recently bought a wonderful farm house out in the country.  We live next to my aunts and uncles.  They taught me that to save money on their trash bill, they have two separate trash cans: one for bagged trash and one for burnable trash.  However, as much as I like to play with fire like the next guy or gal, I often struggle with starting them....which often results in me using up a lighter trying to ignite the same piece of paper or cardboard box multiple times....or I get desperate and use an accelerant like starter fluid or fuel.  :(  Which...BTW...never ends really well.

Also, my husband and family enjoy going camping from time to time...or building a fire in the back yard.  So when I came across the pin, I thought it would be neat to try.

The original pin looked like this:
http://pinterest.com/pin/186547609535442518/
Instructions are found here: http://jjmatheshikes.blogspot.ca/2011/11/i-like-fire-and-im-always-interested-in.html

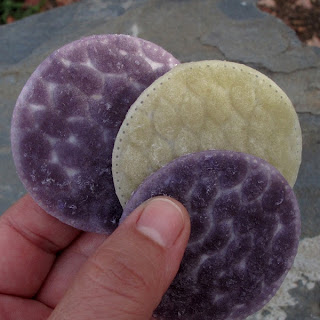
To do mine, however, I chose to use wax that was already melted in my house.  I love candle warmers or tart warmers.  But, eventually they loose their aromatic strength.  I try to doctor them up, at times, with drops or whole bottles of scented oils; but after a while, I have to realize it's time to get a new candle or tart.  UNTIL this pin came along.


I went to the local dollar store and purchased facial cotton pads like the ones below:

I then took, fresh from the warmer, my used up tart tin or the candle from the candle warmer.  I laid out foil on my island, and using tongs, I dipped each pad into the melted wax and immediately laid them out on the island.  WARNING:  be careful that you are NOT hungry while doing this and that you do NOT use candles with scents like "apple cinnamon" or "sugar cookie" or "Pumpkin pie".  They do end up looking like cookies to some (who might be on a diet at the time...and any hint of yumminess would be gladly welcomed). =)


Their effectiveness?  So far...100%.  I only have to use one to start a great fire.  As the original site suggests, you want to tear the disk down to about half way...exposing the cotton fibers inside.  That's the part you want to light.  The wax slows down the burning process allowing for a good length of time for the flame to be exposed to what you want to ignite!

REMEMBER:  As I've told my kids...if you play with fire...you'll pee the bed.  So when you make these...please make sure you wear pullups or something at night. ;o)

Reason for this Blog

I, like many others, have become totally addicted to Pinterest.  I have created boards and gathered many pins. But, as the above quote states, many look at my interest in it the same as the quote explains.  That I will never do the neat pins I've posted or go to the places or create the crafts or use the ideas.  But for me, in the great words of Barney Stenson, "Challenge Accepted."  This blog is to reflect the pins I have tried.  Their perks.  The drawbacks.  And further tips I can give. :)  Enjoy.